In-lab student portal
By default one EasyLab instance serves both the admin space and the student space. You can instead keep a single, central admin instance and deploy a student portal inside each lab's own cluster, next to the workspaces it hands out.
What that changes:
- Each lab has its own address for students — the lab's domain,
https://<lab domain>— instead of every lab sharing the central one. - A lab keeps working without the admin. The portal serves students from a copy of the lab's configuration stored in its cluster, so they can sign in with the password, request and open workspaces while the central instance is down or unreachable.
- The student-facing process holds no admin secrets. It has no cluster-admin kubeconfig, no cloud or DNS credentials and no Pulumi — only a namespaced service account in the lab's cluster.
The two layouts can be mixed: the portal is a per-lab option, and labs without one keep using the central student space.
Run modes
The same image runs in three modes, set with --mode or the EASYLAB_MODE environment
variable:
| Mode | Serves | Use it for |
|---|---|---|
all (default) |
Admin space and student space | A single instance, as before. Labs may still get their own portal. |
admin |
Admin space only | A central admin whose labs all have their own portal. /student/... pages answer 404 and the homepage only offers the admin space. |
student |
The student space of one lab | The in-lab portal. You never start this one yourself — EasyLab deploys it. |
Nothing changes for an existing deployment: without the option, the mode is all.
Give a lab its own portal
- New labs get one by default. On the wizard's Workspace step, Deploy a dedicated student portal in this lab is already checked; there is nothing else to do. The portal is deployed right after the lab's cluster is ready. Uncheck the box to keep a lab on the central student space.
- Labs created before this feature are left as they are. Open the lab's page; the Overview tab has a Student portal strip with a Deploy student portal button. See Managing labs.
The portal is served on the lab's domain itself — the one you entered when creating
the lab, e.g. https://lab.example.com — while workspaces stay on its subdomains
(https://<workspace>.lab.example.com). It is covered by the lab's certificate (the
wildcard certificate when the lab has a DNS provider, a certificate of its own
otherwise). A lab without a domain gets http://<ingress IP>.nip.io.
Which DNS records that takes depends on how the lab's DNS is set up:
| DNS setup chosen in the wizard | Record for the portal (lab.example.com) |
Records for workspaces |
|---|---|---|
| Custom domain — automatic, Wildcard record | Created by EasyLab | *.lab.example.com, created by EasyLab |
| Custom domain — automatic, ExternalDNS | Created by EasyLab | One per workspace, created by ExternalDNS shortly after it starts — there is no wildcard |
| Custom domain — manual | You create lab.example.com |
You create *.lab.example.com |
With manual DNS, mind that the wildcard record does not match the domain itself: the
portal needs its own A record, pointing at the same IP.
Two labs on one domain
Two labs sharing both a namespace and a domain on the same cluster cannot both have a portal on that domain. The second one is refused, and the lab's page says which lab already holds the address.
Configuration
The Student portals page
Two settings apply to every portal. Set them from Student portals in the admin
sidebar (/admin/student-portals):
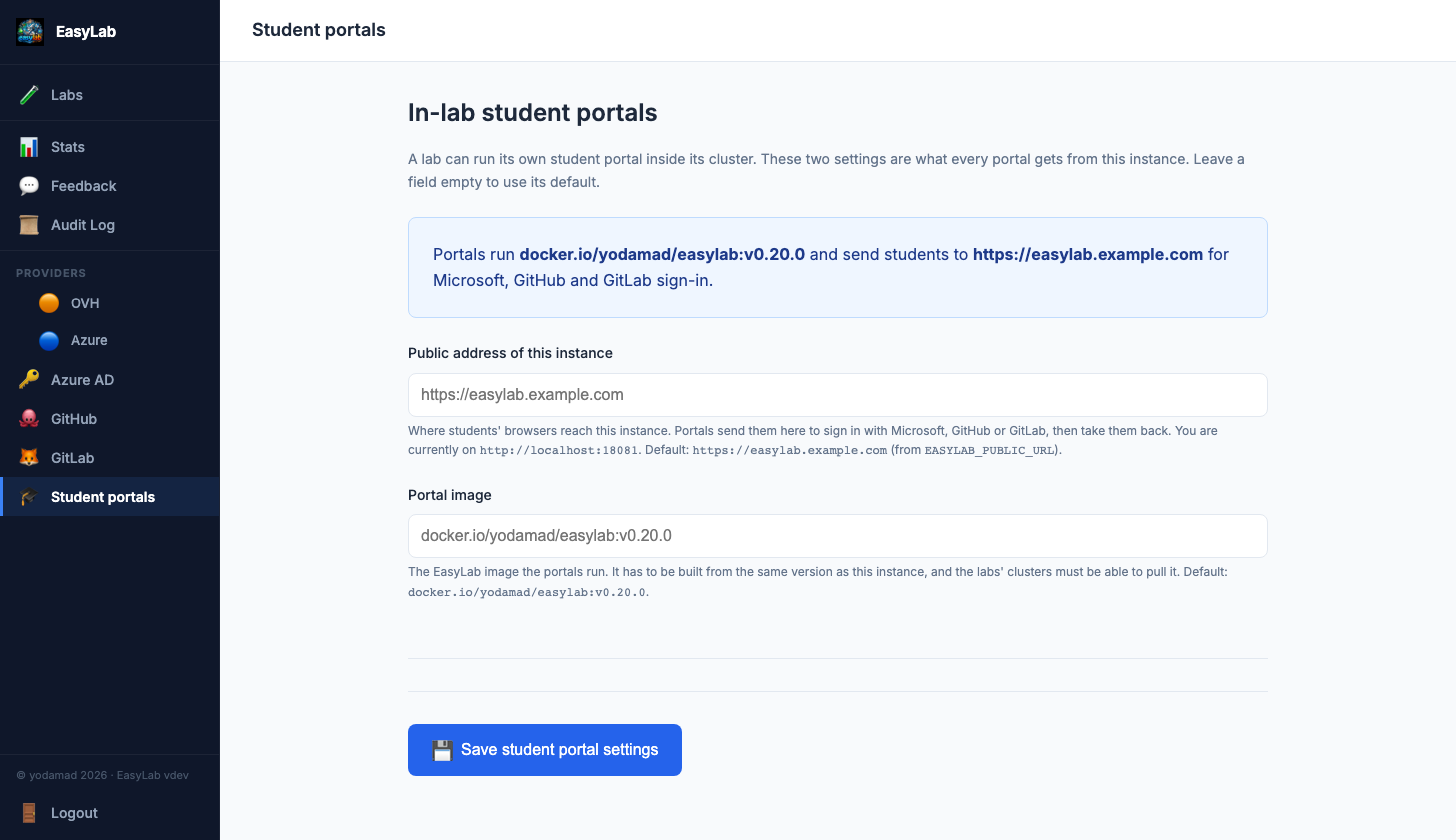
- Public address of this instance — where students' browsers reach the central
instance, e.g.
https://easylab.example.com. Portals send students there for Microsoft / GitHub / GitLab sign-in. Enter the address alone, without a path. The page shows the address you are currently browsing it on, which is usually the right one. Without a public address, portals offer password sign-in only. - Portal image — the EasyLab image the portals run. Normally left empty: a released version uses its own release image.
The box at the top of the page says what portals currently get, and what is missing. Leave a field empty to use its default (shown under the field). Saving applies to the labs that already have a portal too, in the background: a new address reaches them within seconds; a new image restarts them, which signs their students out.
Environment variables
The same two settings can be given as environment variables on the central instance. They are the defaults: a value saved on the page wins over them.
| Variable | Purpose | Default |
|---|---|---|
EASYLAB_MODE |
all or admin (see above). Not on the page: it takes a restart. |
all |
EASYLAB_PUBLIC_URL |
Default for Public address of this instance | unset — portals offer password sign-in only |
EASYLAB_PORTAL_IMAGE |
Default for Portal image | docker.io/yodamad/easylab:v<this version> |
With the Helm chart these are config.mode, config.publicUrl (defaults to the ingress
host) and config.portalImage (defaults to the release's own image) — see
Helm. A Helm install therefore needs nothing set on
the page.
The lab's cluster must be able to pull the portal image
The portal runs the EasyLab image on the lab's nodes. If you use a private mirror, make sure those nodes can pull from it.
Development builds
The portal is the same program as the admin, started in student mode, so it needs an
image built from the same code. A released version uses its own release image
automatically. A build without a version (make dev, go run) has no such image:
the wizard option is then greyed out and labs use the central student space. To try
a portal from a development build, build and push an image from your code and enter
it as the Portal image on the Student portals page.
How students sign in
- Password — checked by the portal itself, against the same student password as the
central instance (
LAB_STUDENT_PASSWORD). It keeps working when the admin is down. -
Microsoft, GitHub, GitLab — the portal shows the same buttons as the central login page, but the sign-in itself runs on the central instance:
- the portal sends the student to the central instance;
- the central instance runs the provider's sign-in as usual;
- it sends the student back to the lab's portal with a signed, 60-second proof of who they are;
- the portal checks it and opens the session.
Nothing has to be registered per lab: the callback URLs you configured for Azure AD, GitHub and GitLab stay the central instance's. This needs the public address to be set, and the central instance to be reachable when a student signs in.
Changes to the sign-in settings on the central instance (a provider enabled, password sign-in turned off, an allowed organization) reach every portal automatically.
Note
Students stay signed in for 24 hours. Sessions live in the portal's memory, so restarting or upgrading a portal signs its students out — as restarting the central instance always did.
What the admin still does
The central instance remains where everything is decided and recorded:
- Every change you make to a lab — templates added or removed, a lab or template closed, a pre-baked image, the lifecycle — is copied to the portal within seconds.
- Workspaces created or deleted, feedback and student activity on the portal are
collected back into the lab's workspace history, the feedback page, the
audit log and the stats. Collection runs every few minutes
(
CLEANUP_INTERVAL_MINUTES) and whenever you open the lab's page or its feedback, so what you see there is current. If the admin is down, the portal keeps it until it is back. - Automatic cleanup (workspace lifetime, lab deletion date) still runs from the central instance.
- Upgrades — after you upgrade the central instance, each portal is moved to the new image on the next cycle.
- Opening a student's workspace as a teacher works as before, and the student is told about it in their portal.
On a combined (all) instance, a lab with its own portal is still listed in the central
student space too, so a student in several labs keeps one place that shows all their
workspaces.
What is deployed in the lab's cluster
All in the lab's workspace namespace, named easylab-portal-<lab id>:
| Resource | Purpose |
|---|---|
| Deployment, Service, Ingress | The portal itself (one replica) and its address |
| ServiceAccount, Role, RoleBinding | The portal's identity and permissions |
Secret …-config |
The lab's configuration as students see it, and the sign-in settings |
ConfigMap …-outbox |
What the portal has to report back until the admin collects it |
The portal's Role is limited to that namespace: it can manage the workspace resources (Deployments, Services, Ingresses, PersistentVolumeClaims) and write its own outbox. Secrets are read-only and limited by name to its own config, the lab credentials the lab's templates reference, and the in-cluster registry's credentials. It cannot create, change or list Secrets, cannot read any other Secret (another lab's portal config, TLS keys), and has no access outside the namespace — except, for a lab without a domain, reading the ingress controller's address. The list of readable Secrets follows the templates: it is updated whenever you add, change or remove one.
Shared namespaces
Kubernetes permissions cannot be narrowed to one lab's workspaces: they are ordinary Deployments. If several labs share a namespace on a bring-your-own cluster, each portal can create, change and delete the others' workspaces — and a workspace it creates can mount any Secret of that namespace. For labs that must be isolated from each other, give each its own Workspace Namespace.
Removing the portal (or destroying the lab) deletes all of it, after collecting anything still waiting in the outbox.